
Footage and agentic editing
Motion Graphics by Conversation: Build a Real Video With Remotion and an Agent
Build a 20-second data explainer in code with Remotion and a coding agent, then export it horizontal and vertical from one set of components.
For a chart animation or a short explainer built on numbers, you can write the motion as code instead of keyframing it. Remotion renders React components to video, and its official Agent Skills teach a coding agent such as Claude Code, Codex or Cursor how to write those components well. You describe the piece, the agent writes it, you review frames and change data or timing, and the video re-renders.
This tutorial builds one real piece end to end: a 20-second, 1920×1080, 30 fps explainer with three figures that change, plus a 1080×1920 vertical version that reuses the same components. The subject is how much drive space an hour of 1080p footage takes in three flavors of ProRes, using Apple's published target data rates. Everything was run with Remotion 4.0.543 and Node 22 on a Mac.
The project was built by an AI agent from a brief like the one below, so treat this as a record of what that process produces, including the review pass and the fixes it led to. The prompt is the one to give your own agent.
When code is the right tool for motion
Code-based motion earns its place when the content is structured and likely to change:
- Data-driven pieces. The figures live in an array. Change a number and every scene that uses it, including the closing comparison, updates on the next render.
- Versions. The same composition renders at 16:9 and 9:16, or with a different data file, without duplicating a project.
- Series. A template for a monthly report or a set of product explainers stays consistent because every episode runs the same components.
- Review and history. The project is plain text in a Git repository. A change of timing is a one-line diff you can read, revert or hand to a colleague.
A timeline tool such as After Effects or your editor's title tools is still the better choice when you're shaping motion by eye, frame by frame: character animation, work that sits on top of live-action footage, cutting to picture and music, or early design exploration where you don't yet know what the piece is. If your team already works in a timeline and the piece will be made once, the code route adds setup without much return. A practical split: design the look by eye, then build the parts that repeat or carry data in code.
What you'll build
The explainer has five scenes, and every duration comes from one timing file.
| Scene | Length | What's on screen |
|---|---|---|
| Intro | 3 s | Question and subtitle |
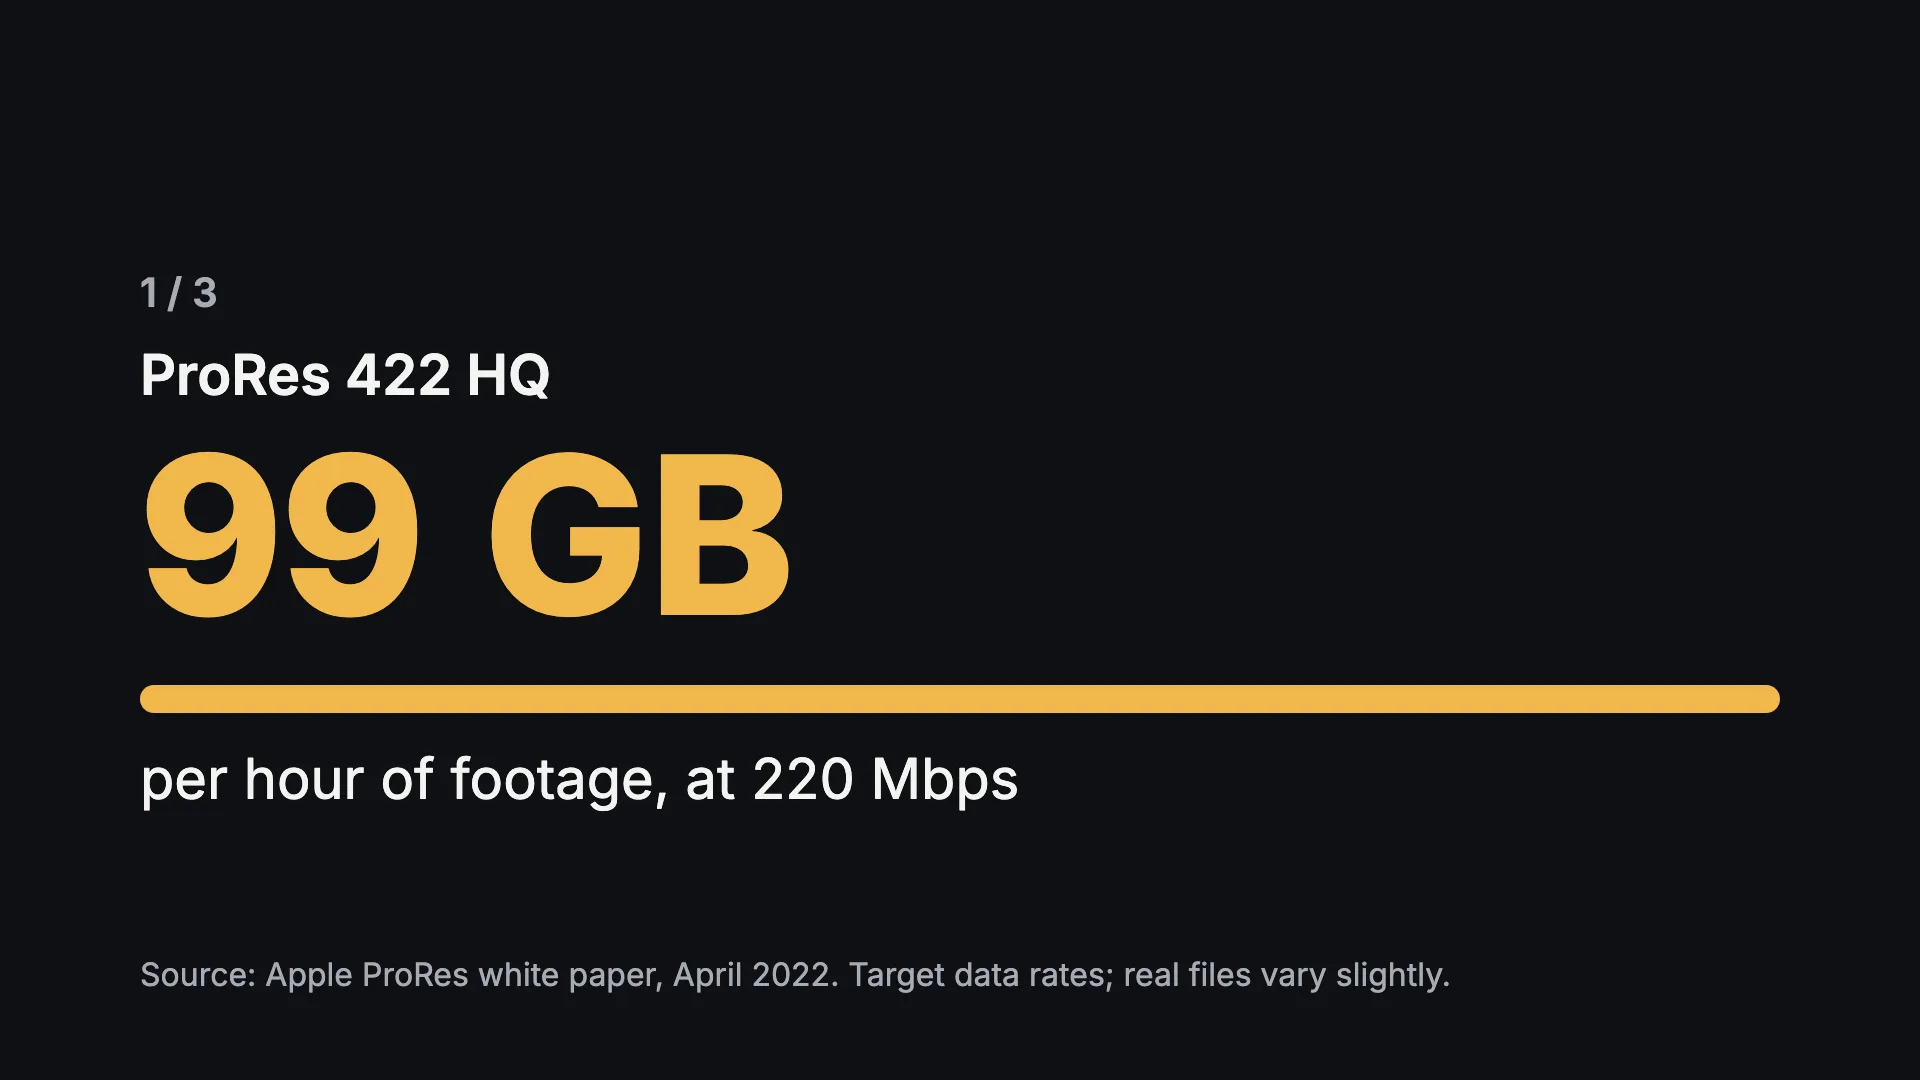
| Figure 1 | 4 s | ProRes 422 HQ: 99 GB per hour, at 220 Mbps |
| Figure 2 | 4 s | ProRes 422: 66 GB per hour, at 147 Mbps |
| Figure 3 | 4 s | ProRes 422 LT: 46 GB per hour, at 102 Mbps |
| Outro | 5 s | All three as bars, with the source |
The numbers come from the Target Data Rates table in Apple's ProRes white paper (April 2022), row 1920×1080 at 30p. Apple's ProRes support article gives the same megabit rates. The white paper notes that ProRes is variable bit rate but that actual rates usually stay close to the target, so the video says "real files vary slightly" on screen. The gigabytes per hour are computed in code as Mbps × 3600 ÷ 8 ÷ 1000, which matches Apple's own GB/hr column for these rows.
Pick a subject you can source the same way. If you can't cite the numbers, label them as illustrative on screen and in any description of the video.
Set up the project and install the skills
Remotion's docs list Node 16 or later and, on a Mac, macOS 15 or later as prerequisites. The blank template generated here declares Node 20.19, 22.13 or 24 and up in its package.json, so use a current LTS release.
Create a blank project without the interactive wizard, add the skills, and add the Google Fonts package:
npx create-video@latest --yes --blank remotion-explainer
cd remotion-explainer
npx remotion skills add
npx remotion add @remotion/google-fonts
The scaffold installs dependencies and makes a Git repository with a first commit. npx remotion skills add installed 13 skills into .agents/skills, which agents such as Codex and Cursor read, and linked them into .claude/skills for Claude Code. It also writes a skills-lock.json with a hash for each skill, so the skills are versioned with the project. The Agent Skills page lists them and gives npx skills add remotion-dev/skills as another way to install them. The ones you'll lean on most are remotion-best-practices, remotion-markup (animation, layout, typography) and remotion-render.
Check the license before client work
Remotion isn't free for every company. Its License & Pricing page says the free license covers individuals and companies of up to three people. Larger companies need a company license; at the time of writing, the "Remotion for Creators" option for manual video creation is $25 per seat per month, and there's a per-render option for automated rendering. The License FAQ covers edge cases, including how headcounts combine when a client operates the project and the separate route for qualifying nonprofits. The installed remotion-license skill gives the agent the same information.
Write the brief before the prompt
An agent fills every gap you leave with a default. A short written brief closes most of them. This is the one used here:
- Purpose. Answer one question for editors and producers: how much drive space an hour of 1080p footage takes in ProRes 422 HQ, 422 and LT.
- Format. 20 seconds, 1920×1080 at 30 fps, plus a 1080×1920 vertical. No audio.
- Structure. Intro, one scene per figure, closing comparison.
- Data. The three figures as an array; the source on screen in every scene that shows a number.
- Look. Dark background, one warm accent, Inter. Large type: nothing under 32 px on a 1080-pixel short side, and body text at 40 px or more.
- Motion. Calm. Springs with no bounce for entrances, one ease-out for counting numbers, a short fade out. No flashes or fast flicker.
- Out of scope. Logos, music, voice-over, footage.
Then the prompt you give the agent, in the project folder:
Using the Remotion skills in this project, build the explainer described in BRIEF.md.
- Put the figures in one typed array and all durations, in seconds, in one timing file.
- One component per scene. Scenes play back to back.
- Animate with spring() and interpolate() driven by useCurrentFrame(), never CSS transitions.
- Register two compositions from the same component: "Explainer" at 1920x1080 and
  "ExplainerVertical" at 1080x1920, both 30 fps. Adapt layout from the frame size.
- When it builds, render stills at frames 60, 200 and 560 for both compositions and
  stop for review before rendering video.
Asking for stills before the full render keeps the first review fast, and it gives you specific frames to talk about.
How the composition is structured
Keep every file small and give it one job.
| File | Job |
|---|---|
src/data.ts | The Figure and props types, and the Mbps-to-GB conversion |
src/timing.ts | Frame rate, every duration in seconds, total length |
src/theme.ts | Font, colors, type scale |
src/useLayout.ts | Padding and footer position for horizontal or vertical frames |
src/scenes/ | Intro, FigureScene, Outro, plus the shared Bar and Source |
src/Explainer.tsx | Plays the scenes in order |
src/Root.tsx | Registers both compositions and their data |
The timing file is the part you'll edit most:
export const FPS = 30;

// Every duration lives here, in seconds.
export const TIMING = {
  intro: 3,
  figure: 4,
  outro: 5,
};

export const sec = (s: number) => Math.round(s * FPS);

export const totalFrames = (figureCount: number) =>
  sec(TIMING.intro) + figureCount * sec(TIMING.figure) + sec(TIMING.outro);
The scenes play back to back with Remotion's <Series>, one figure scene per item in the data:
{figures.map((figure, i) => (
  <Series.Sequence key={figure.codec} durationInFrames={sec(TIMING.figure)}>
    <FigureScene figure={figure} index={i} total={figures.length} max={max} source={source} />
  </Series.Sequence>
))}
Inside a figure scene, the label enters on a spring() with high damping, which settles without overshoot. The number counts up with interpolate() over 1.4 seconds, and the bar under it reuses the same value:
const labelIn = spring({ frame, fps, config: { damping: 200 } });
// The number and the bar share one curve, so they land together.
const count = interpolate(frame, [0.2 * fps, 1.6 * fps], [0, 1], {
  easing: Easing.out(Easing.cubic),
  extrapolateLeft: "clamp",
  extrapolateRight: "clamp",
});
The installed skills nudge toward Remotion's newer editable-timeline structure (named tracks and Studio-editable elements) for scenes you'll arrange by hand. They also say that loops suit output controlled as one template. A data-driven explainer is that case, so <Series> and a map() are the simpler fit here.
Review the first pass
Render stills before video, at the frames you named in the prompt:
npx remotion still Explainer out/review/h-200.png --frame=200Look at three moments in each scene: mid-entrance, settled, and exit. Check four things.
- Hierarchy. One thing should read first. Here, the number. The codec name is second; the rate and source are last and smaller.
- Easing. Entrances should finish before the viewer starts reading. A count that's still moving when the scene starts fading out is too slow.
- Overlap. Text against text, text against the edge, and on vertical, text in the bottom area where social apps draw captions and buttons. Check your target platform's own safe-zone guidance.
- Hold time. Read every screen aloud at a normal pace. If you can't finish before it changes, it needs more time.
The first pass here built and played correctly, and the review still found real problems:
- The figure scenes left the right two-thirds of the frame empty, and nothing tied each figure to the closing comparison.
- The outro had 3.5 seconds to show three staggered bars and their values. Read aloud, that wasn't enough.
- On the vertical frame, the source line sat at the very bottom of the frame, where social apps overlay their controls.
Audio sync doesn't apply to this piece, because it's silent. If you add music, check that scene changes land on beats by rendering stills on the frames where they should.
Revise by changing data and timing
Fixes in a code-based piece are mostly edits to values, not rebuilt keyframes.
Timing. Each figure went from 4.5 to 4 seconds and the outro from 3.5 to 5. The total stays at 20 seconds, and every scene boundary moved with no other edits, because nothing outside timing.ts hard-codes a frame number.
Components. The progress bar from the outro became a shared Bar component. Each figure scene now draws its value against the largest figure, which fills the empty side of the frame and sets up the closing comparison. The vertical layout got a higher footer: footer: vertical ? 280 : 84 in useLayout.ts.
Data. The figures moved from a hard-coded constant into the composition's defaultProps, and the length now follows the data with calculateMetadata:
// Length follows the data: add a figure and the video grows by one scene.
const calculateMetadata: CalculateMetadataFunction<ExplainerProps> = ({ props }) => ({
  durationInFrames: totalFrames(props.figures.length),
});
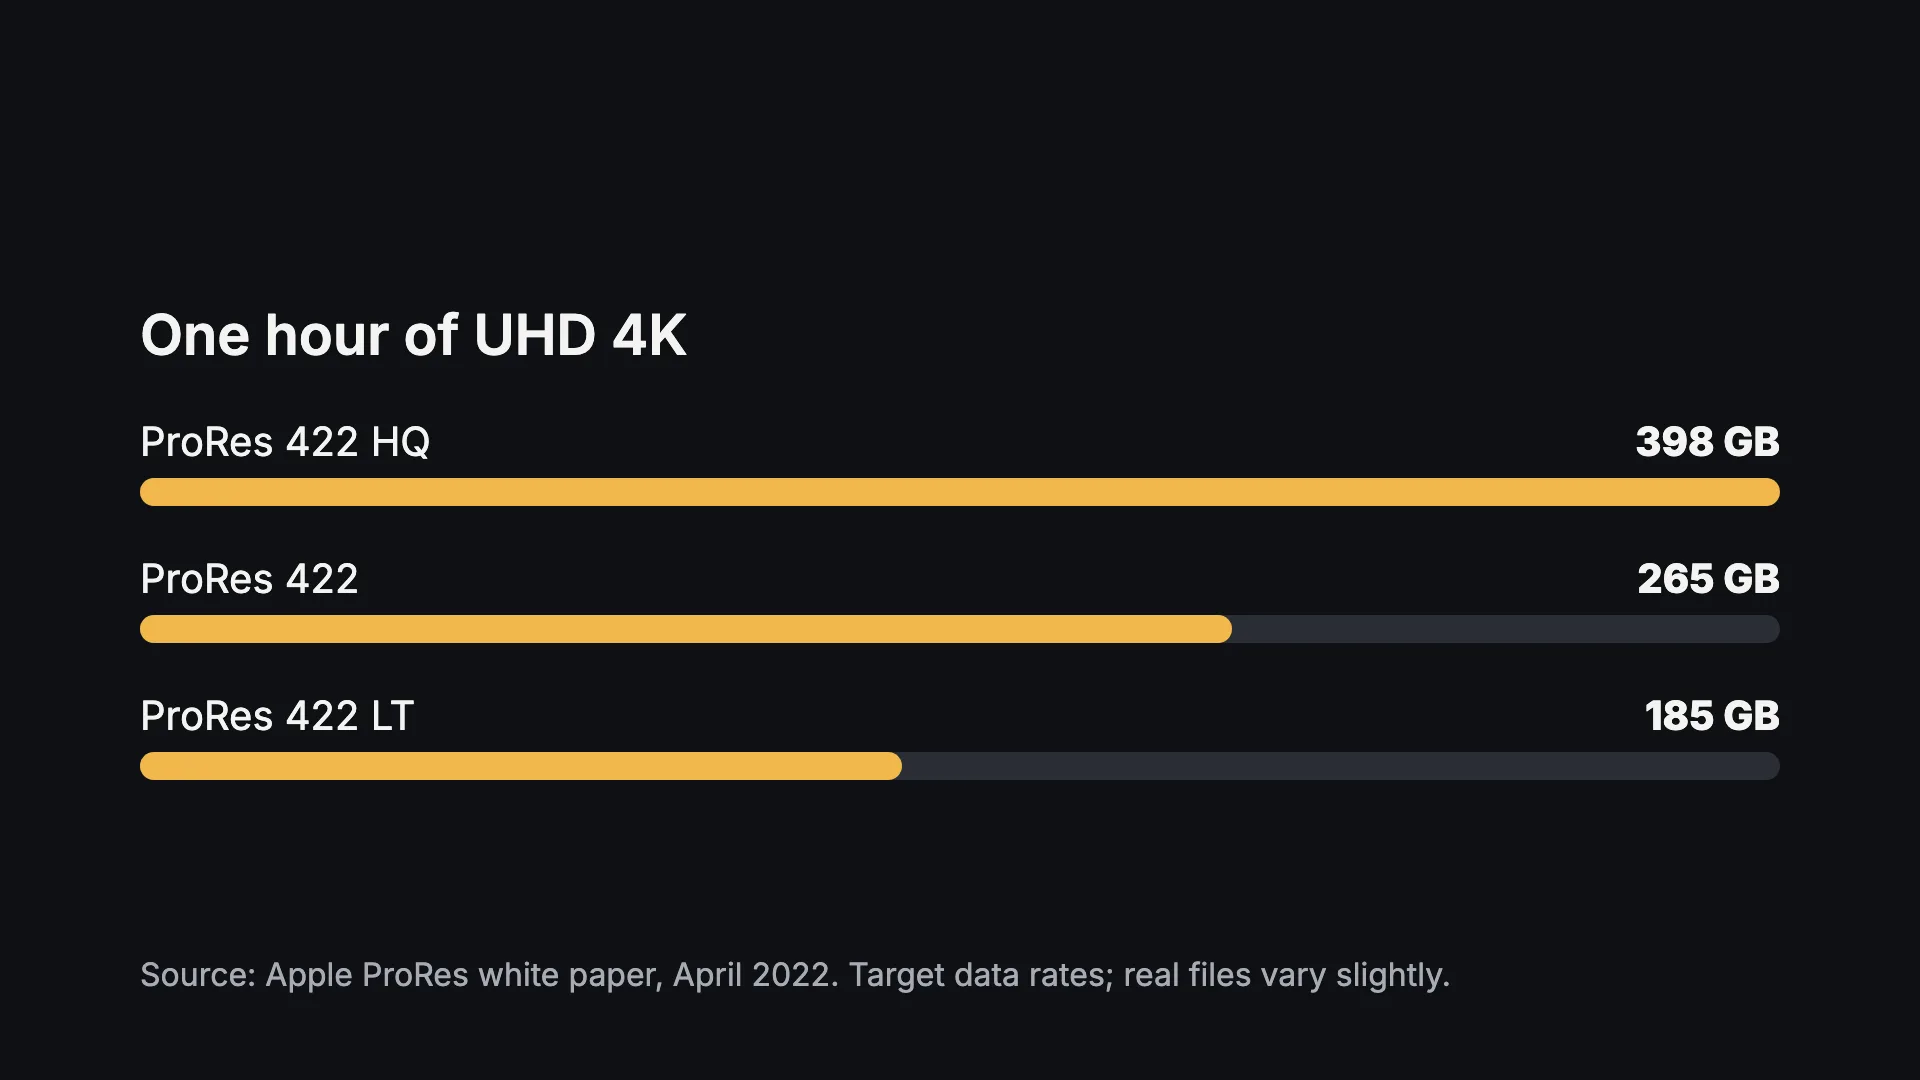
That makes a second version a data file, not a second project. This uhd.json uses the white paper's 3840×2160 at 30p row:
{
  "title": "How much drive space does an hour of 4K footage take?",
  "subtitle": "3840×2160 at 30 fps, three flavors of ProRes",
  "heading": "One hour of UHD 4K",
  "figures": [
    { "codec": "ProRes 422 HQ", "mbps": 884 },
    { "codec": "ProRes 422", "mbps": 589 },
    { "codec": "ProRes 422 LT", "mbps": 410 }
  ],
  "source": "Source: Apple ProRes white paper, April 2022. Target data rates; real files vary slightly."
}
Render it by passing the file with --props:
npx remotion render Explainer out/explainer-uhd-data.mp4 --props=./uhd.jsonThe computed values, 398, 265 and 185 GB per hour, match the GB/hr column in Apple's table.
Commit after each round. The scaffold's Git repository means your client's "go back to the earlier timing" is a git diff away.
Export horizontal and vertical
Both formats are registered from the same Explainer component in Root.tsx, one at 1920×1080 and one at 1080×1920. The layout reads the frame size and adjusts padding and the footer:
export const useLayout = () => {
  const { width, height } = useVideoConfig();
  const vertical = height > width;
  return {
    vertical,
    pad: vertical ? 96 : 140,
    // Keep the source line above the area where social apps draw their controls.
    footer: vertical ? 280 : 84,
  };
};
Render both with the render command:
npx remotion render Explainer out/explainer-1080p.mp4
npx remotion render ExplainerVertical out/explainer-vertical.mp4
The first render downloaded a headless Chrome build (about 140 MB). After that, each 20-second version took about 10 seconds on the Mac used here. Each output is H.264 at around 560 to 570 KB, because flat color compresses well. Confirm the format before you deliver:
ffprobe -v error -show_entries stream=width,height,r_frame_rate,nb_frames -of csv=p=0 out/explainer-vertical.mp4That prints 1080,1920,30/1,600: the right size, 30 fps, and 600 frames, or exactly 20 seconds.
For stills on a web page, render a frame with remotion still and convert it to WebP:
npx remotion still Explainer out/figure.png --frame=170
cwebp -q 82 out/figure.png -o out/figure.webp
QA checklist
Run through this before the piece leaves your machine.
- Numbers. Every figure on screen matches its source, and the source is on screen wherever a number is.
- Units. GB versus GiB, Mbps versus MB/s, and frame rate are stated or obvious.
- Hold time. Every screen can be read aloud at a normal pace before it changes.
- Type. Nothing below your minimum size; check the smallest text on a phone.
- Contrast. Text against background meets at least 4.5:1. Here, the muted gray is about 8:1 and the accent over 10:1.
- Motion. No bounce where you wanted calm, no flashing, and every entrance settles before the exit begins.
- Overlap. No text collides with other text or the frame edge, and vertical text clears the platform's overlay area.
- Both formats. Check stills from the same frames in each composition, not only the one you designed in.
- Data versions. Render every props file you deliver; a long label in one data set can wrap where the default didn't.
- Output. Size, frame rate, frame count and duration match the delivery spec.
- License. Your organization qualifies for the free license, or has a company license.
- Source control. The final render matches a commit you can return to.
Where to take it next
Real shots make a data piece stronger: a camera card behind the storage figure, or a project's footage behind its runtime. Find those before you brief the agent, so the brief can name the actual files. If your footage and stills are already cataloged, Grain Photo, the Mac app we make, lets an agent on the same Mac search the library and gather the shots into a collection over MCP; Remotion's skills then cover placing images and video in a composition.
The project here is small on purpose: about a dozen short files, and one data array that drives every number on screen. That's the point of the method. When the numbers change next quarter, you edit the array and render again.